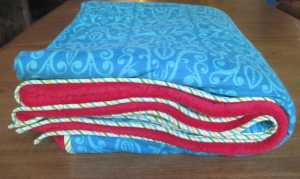
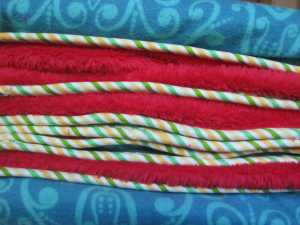
I thought I would take a break from blogging about my recent trip and instead show you all how I make one of my standard gifts. My favorite thing about these blankets is that they tend to be used a lot. They are perfect for cold Alaskan winters.
I call them Fleece Flannel Blankets, but they can also be made with Minky or other soft fabrics.
I make them in all different sizes from little baby quilts of about 30” by 40” to a throw size of about 60” x 70”. Whatever width I decide to make it, I just add ten inches to the length and that always seems to be about right.
To make one of these uber-comfy blankets in a throw size, you need the following materials.
Three yards of a respectable flannel. I might buy fleece or Minky at Jo-Anns, but I always buy my flannel at a quality fabric store.
Two yards of soft fabric–minky, fleece, or other super soft fabric is perfect.
One half a yard of cotton fabric for your binding. Again, always buy the best fabric you can afford.
- Three yards of washed flannel fabric
- 1/2 yard of quilters cotton fabric
- 2 yards of Minky or Fleece or other soft fabric
A sewing machine, thread for piecing, thread for stitching the binding on, regular rotary cutter and ruler with cutting mat. Basically, the standard supplies you need for any quilting or sewing project.
Wash and iron all of your fabric before you begin to sew. These instructions and measurements are approximate. When you wash and dry flannel it often shrinks.
Step Number One
Cut one yard of fabric off of your three yard cut of flannel. Take that yard and cut it again lengthwise. You now have two pieces of fabric that measure approximately 20 inches by 36 inches. Sew these two pieces of fabric together so that your fabric now measured 72 inches by 20 inches. Sew using a 1/2 or larger seam allowance. Iron this seam allowance open.
Step Number Two
Sew the 20 inch wide fabric to the other two yards of flannel. You now have a piece of flannel that measures approximately 60 inches by 72 inches. Iron that seam open and then iron the entire piece of fabric so that it is smooth and without wrinkles.
- Here is the two yard with the one yard cut sewn, so that it now measures approximately 20 inches by 72 inches.
- Here is what the flannel looks like from the backside.
- Here is what the flannel fabric looks like from the front side. You can barely see the seams.
Step Number Three
Find a big enough space to put the soft fabric on the ground and smooth it out so that there are no wrinkles. You should place the fabric on the ground with the right side of the fabric facing the floor. Now, lay the flannel on top of the soft fabric right side up. Again, smooth everything out. These two pieces of fabric will not be exactly the same size. This is okay and we will deal with it in a moment.
Step Number Four
Using two prong sewing pins, pin all the way around the blanket. I did not know this, but the official name for these pins is Fork Pin. Who knew that?

These are the two pronged pins. You can buy them here. Of course, you can make this blanket without them, but it is much easier with them.
Step Number Five
Using your walking foot, stitch around the blanket using a 1/2 inch seam allowance.
Step Number Six
Using your rotary cutter and ruler, trim the seam allowances to 1/4 of an inch.

You should trim the edge to be 1/4 of an inch. It can be smaller, but not larger. A larger seam will not fit inside the binding.
Step Number Seven
Make your binding and attach it to the blanket using your favorite method. I like to cut a 2 1/4 inch binding, and I attach it to the blanket by machine for both sides. Here is my tutorial for an All Machine Stitched Binding. If you are planning to hand stitch one side of your binding, attach it by machine to the soft fabric side first. Hand stitching on Minky is a pain.
I promise to eventually write a post about my favorite method for twirly striped bindings when it is cold and dark in Alaska–most likely sometime in November. Maybe sooner if it starts raining.
And now it is time to enjoy your blanket!
PS- I finally wrote about Twirly Striped Bindings and All Machine Stitched Bindings!


Maria — do the two layers tend to separate or become different sizes or develop different lumps as time goes by? in other words, would this be better if the two layers were quilted or tied together?
Kathy- I have thought a lot about your question, and I am now going to change my reply. When I first started making these blankets, I tried to make the top and bottom the same size and stitch them together–when I did it that way there was shifting and sometimes one side or another would sag away from the other side. Now that I wait to trim the back to the front side after I stitch around the blanket I no longer have this problem. I hope this answers you question properly. Thank you for stopping by!
I think that @kathy loomis was speaking about after the blanket is finished.
I’ve used the method of making blankets sewing right sides together, leave an opening for pulling everything through so that the right sides are on the outside, then sewing up the opening with a top stitching with walking foot continuing around total perimeter of blanket about 1/2″ seam. After this I would randomly quilt a motif or outline of a shape printed on the material itself to help hold layers together.
That looks so nice and comfy! It’s winter here in Australia so it looks very inviting.
Karen-
They are the best blankets. My boys kept stealing mine, so one year I made each of them one for Christmas. That was almost four years ago and the blankets are still in good shape.
Pingback: Twirly Striped Bindings | Maria Shell
Pingback: Happy Anniversary! | Maria Shell
Thanks for the tip about washing the fabric first, I was worried about shrinkage but it never occurred that I could wash them ahead of time… also, the tip about trimming after everything is sewn is genius!
Thank you Cindy. Isn’t it funny that sometimes the simplest solution is the answer, and it takes us years to figure it out.
Pingback: Image Journal #6 | Maria Shell
Pingback: Image Journal #13 | Maria Shell
Pingback: All Machine Stitched Binding | Maria Shell
Do you also prewash you fleece? The blanket looks great!
That is a good question. I almost always prewash everything if I can, so I am going to say yes. I hope you give the blanket a try. They are super fun gifts.
Thanks for answer. I am going to try this blanket for Christmas.
You are welcome! Use those two prong fork pins for sure. They make a big difference in being able to handle the bulk. Good luck!
My 1.5 yo godson needs a warm blanket and I need to reduce the size of my fabric stash. I had my now 12 yo grandson’s blue shaggy fleece throw, and a variety of flannels….and then I found your post! I got lazy and decided to cut the fleece 2″ bigger than the pieced flannel topper and self-bound it. I love it !! We’re in the middle of a raging lake effect snow storm today (2 feet and counting!), so I’ll have to wait until tomorrow to see if he loves it too. Thanks for sharing 🙂
Valerie- What a great idea! I hope he loves it as much as my boys love theirs.
I wish I could share a photo. His mama says “wherever he goes…..it goes!” Thanks again
Valerie- There is something super special about those blankets. They are super comfy. I would love a photo!
carburgett@yahoo.com
Please email me.
I bought a piece of material that is fleece but the fleece is shaped in the shape of a rosette and the other side of the fleece is slick like polyester and I bought a piece of flannel or the other side from Joanns and I’m wondering if I need like any kind of fusion material to go on the back of this Joanns tells me no What do you think? It’s a baby blanket 45×42.
Dear Carrie–
I emailed you this note, but thought other readers might want to read too, so I am posting it here.
It is hard to say without seeing the fabric. Usually I use fleece or minky that is the same on both sides. The nap of those two fabrics is what holds the blanket together without quilting. I have not tried to make one of these blankets using the fabric you described, so I am not sure what the outcome will be.
You could do minimal walking foot quilting to hold together. Or you could just try it and see what happens.
Good Luck!
Thanks for posting this! Could you also stitch both wrong sides together and turn inside out and top stitch if you didn’t want to use a binding?
Yes. I think you could do that. It is a lot bulk to try and stitch through–you would have two layers of minky and two layers of flannel, but it is worth try. I like the binding because is makes it look a bit fancier. In the beginning I used to do a serged finish around the edge. That is quick, but not as nice looking. Thank you for stopping by. Good luck with your blankets!
I am making a weighted blanket using one side fleece and one side flannel (love the fork needle tip fyi – have to go buy some before I start)
Wanted to know what type of thread and needle you recommend. Some sites say to use a 12, others say 14, and still others say 16. Also – any special thread?
Thanks!
I always use Aurifil 50wt in a neutral color and the standard sewing machine needle for making these blankets. Good luck!